OpenVPN 一键部署脚本
下载一键部署脚本
mkdir -p /home/install/openvpn
cd /home/install/openvpn
wget https://raw.githubusercontent.com/Nyr/openvpn-install/master/openvpn-install.sh -O openvpn-install.sh

# 个人Fork地址下载会快点儿
wget https://www.snynas.com:20043/pub/openvpn-install/-/raw/master/openvpn-install.sh?inline=false -O openvpn-install.sh
授权并运行
chmod +x openvpn-install.sh
运行并设置
bash openvpn-install.sh

This server is behind NAT. What is the public IPv4 address or hostname?
Public IPv4 address / hostname [公网IP]:       #监听的IP默认即可
Which protocol should OpenVPN use?
   1) UDP (recommended)
   2) TCP
Protocol [1]: 2             #协议我这里使用TCP
What port should OpenVPN listen to?
Port [1194]:                #端口可以额外制定,或者默认
Select a DNS server for the clients:
   1) Current system resolvers
   2) Google
   3) 1.1.1.1
   4) OpenDNS
   5) Quad9
   6) AdGuard
DNS server [1]: 1                       #DNS我这里选择1 保持不变
Enter a name for the first client:
Name [client]: test                     #创建用户
...
The client configuration is available in: /root/test.ovpn
New clients can be added by running this script again.
证书下载地址在
/root/xxx.ovpn
如果需要修改默认证书保存路径请按照以下方式修改
编辑第一步下载的一键部署脚本文件
vi openvpn-install.sh

# 修改以下三个地方
# 1)修改一, ~/"$client".ovpn 改为 [你的目标存储路径]/"$client".ovpn
new_client () {
    # Generates the custom client.ovpn
    {
    cat /etc/openvpn/server/client-common.txt
    echo "<ca>"
    cat /etc/openvpn/server/easy-rsa/pki/ca.crt
    echo "</ca>"
    echo "<cert>"
    sed -ne '/BEGIN CERTIFICATE/,$ p' /etc/openvpn/server/easy-rsa/pki/issued/"$client".crt
    echo "</cert>"
    echo "<key>"
    cat /etc/openvpn/server/easy-rsa/pki/private/"$client".key
    echo "</key>"
    echo "<tls-crypt>"
    sed -ne '/BEGIN OpenVPN Static key/,$ p' /etc/openvpn/server/tc.key
    echo "</tls-crypt>"
    } > ~/"$client".ovpn
}

# 修改后如下:
new_client () {
    # Generates the custom client.ovpn
    {
    cat /etc/openvpn/server/client-common.txt
    echo "<ca>"
    cat /etc/openvpn/server/easy-rsa/pki/ca.crt
    echo "</ca>"
    echo "<cert>"
    sed -ne '/BEGIN CERTIFICATE/,$ p' /etc/openvpn/server/easy-rsa/pki/issued/"$client".crt
    echo "</cert>"
    echo "<key>"
    cat /etc/openvpn/server/easy-rsa/pki/private/"$client".key
    echo "</key>"
    echo "<tls-crypt>"
    sed -ne '/BEGIN OpenVPN Static key/,$ p' /etc/openvpn/server/tc.key
    echo "</tls-crypt>"
    } > /home/openvpn-clients/"$client".ovpn
}


# 2)修改二, ~/"$client.ovpn" 改为 [你的目标存储路径]/"$client.ovpn"
verb 3" > /etc/openvpn/server/client-common.txt
    # Enable and start the OpenVPN service
    systemctl enable --now openvpn-server@server.service
    # Generates the custom client.ovpn
    new_client
    echo
    echo "Finished!"
    echo
    echo "The client configuration is available in:" ~/"$client.ovpn"
    echo "New clients can be added by running this script again."
else
    clear
    echo "OpenVPN is already installed."
    echo
    echo "Select an option:"
    echo "   1) Add a new client"
    echo "   2) Revoke an existing client"
    echo "   3) Remove OpenVPN"
    echo "   4) Exit"
    read -p "Option: " option

# 修改后如下:
verb 3" > /etc/openvpn/server/client-common.txt
    # Enable and start the OpenVPN service
    systemctl enable --now openvpn-server@server.service
    # Generates the custom client.ovpn
    new_client
    echo
    echo "Finished!"
    echo
    echo "The client configuration is available in:" /home/openvpn-clients/"$client.ovpn"
    echo "New clients can be added by running this script again."
else
    clear
    echo "OpenVPN is already installed."
    echo
    echo "Select an option:"
    echo "   1) Add a new client"
    echo "   2) Revoke an existing client"
    echo "   3) Remove OpenVPN"
    echo "   4) Exit"
    read -p "Option: " option


# 3)修改三, ~/"$client.ovpn" 改为 [你的目标存储路径]/"$client.ovpn"
1)
    echo
    echo "Provide a name for the client:"
    read -p "Name: " unsanitized_client
    client=$(sed 's/[^0123456789abcdefghijklmnopqrstuvwxyzABCDEFGHIJKLMNOPQRSTUVWXYZ_-]/_/g' <<< "$unsanitized_client")
    while [[ -z "$client" || -e /etc/openvpn/server/easy-rsa/pki/issued/"$client".crt ]]; do
        echo "$client: invalid name."
        read -p "Name: " unsanitized_client
        client=$(sed 's/[^0123456789abcdefghijklmnopqrstuvwxyzABCDEFGHIJKLMNOPQRSTUVWXYZ_-]/_/g' <<< "$unsanitized_client")
    done
    cd /etc/openvpn/server/easy-rsa/
    EASYRSA_CERT_EXPIRE=3650 ./easyrsa build-client-full "$client" nopass
    # Generates the custom client.ovpn
    new_client
    echo
    echo "$client added. Configuration available in:" ~/"$client.ovpn"
    exit
;;

# 修改后如下:
1)
    echo
    echo "Provide a name for the client:"
    read -p "Name: " unsanitized_client
    client=$(sed 's/[^0123456789abcdefghijklmnopqrstuvwxyzABCDEFGHIJKLMNOPQRSTUVWXYZ_-]/_/g' <<< "$unsanitized_client")
    while [[ -z "$client" || -e /etc/openvpn/server/easy-rsa/pki/issued/"$client".crt ]]; do
        echo "$client: invalid name."
        read -p "Name: " unsanitized_client
        client=$(sed 's/[^0123456789abcdefghijklmnopqrstuvwxyzABCDEFGHIJKLMNOPQRSTUVWXYZ_-]/_/g' <<< "$unsanitized_client")
    done
    cd /etc/openvpn/server/easy-rsa/
    EASYRSA_CERT_EXPIRE=3650 ./easyrsa build-client-full "$client" nopass
    # Generates the custom client.ovpn
    new_client
    echo
    echo "$client added. Configuration available in:" /home/openvpn-clients/"$client.ovpn"
    exit
;;
退出保存后
证书下载地址在
/home/openvpn-clients/xxx.ovpn
连接测试
一、下载 OpenVpn 客户端, Windows 用户可以下载 windows-openvpn.msi, Mac 用户可以下载 mac-openvpn.dmg 或 mac-openvpn-client-Tunnelblick
二、下载前面创建好的 xxx.ovpn 证书文件
三、配置客户端
Windows 配置
- 安装
windows-openvpn.msi - 打开安装好的客户端


- 选择
FILE选项卡,并拖入下载好的证书文件
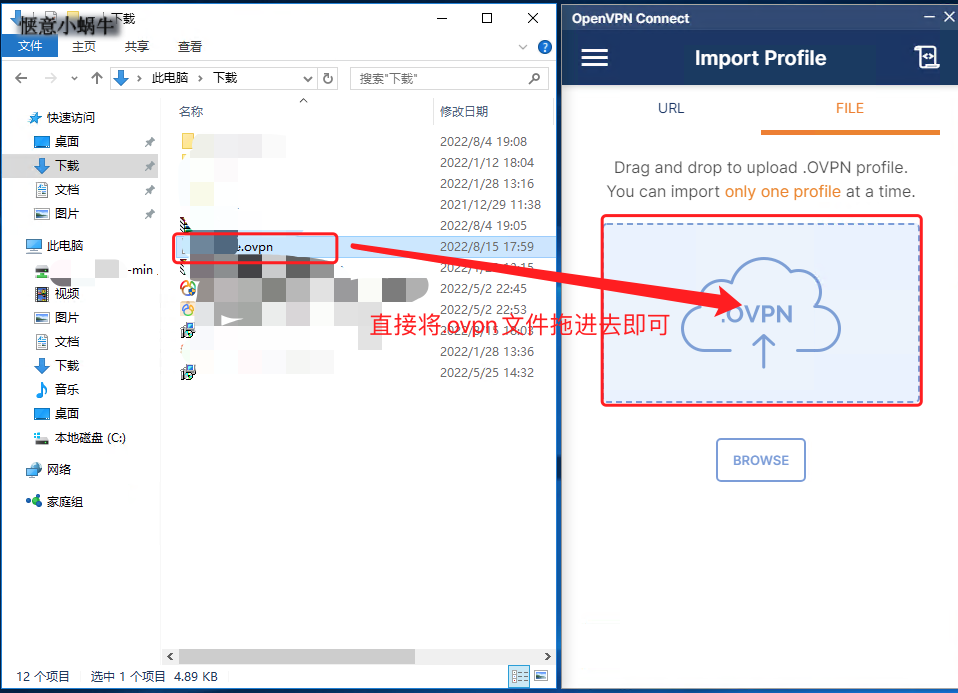
拖入后会显示你 OpenVpn 服务端部署机的公网IP地址

-
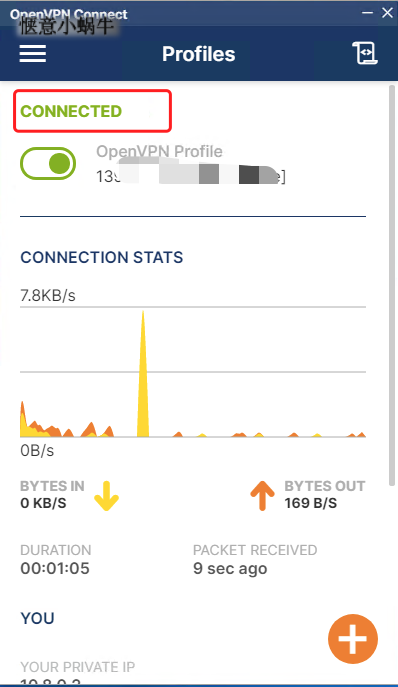
点击 “connect” 按钮连接 OpenVpn 进行测试
连接中…

连接成功
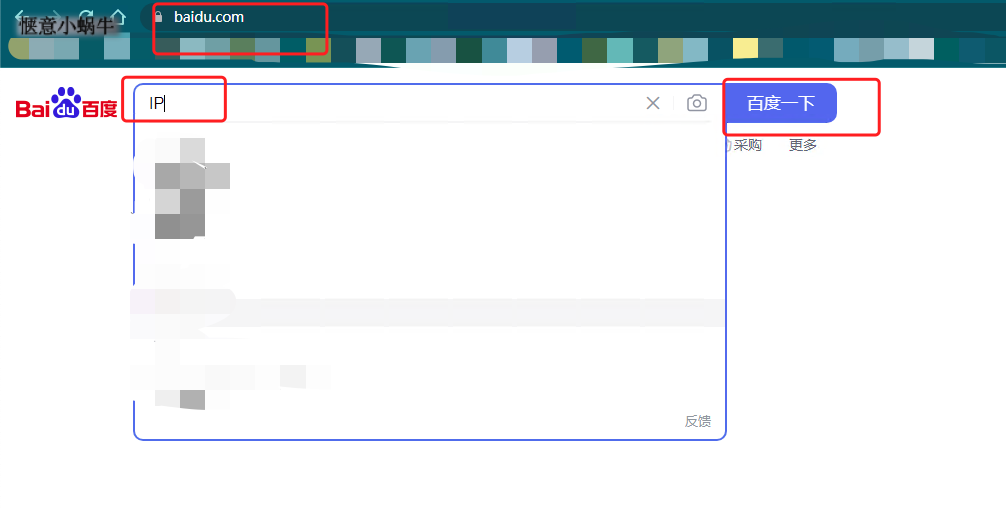
验证结果
查出来的 本机IP 如果与上图 客户端中显示的 IP 相同即为成功连接

Mac 配置
OpenVpn 客户端
-
安装
mac-openvpn.dmg客户端 -
打开安装好的客户端

-
选择
FILE选项卡,并拖入下载好的证书文件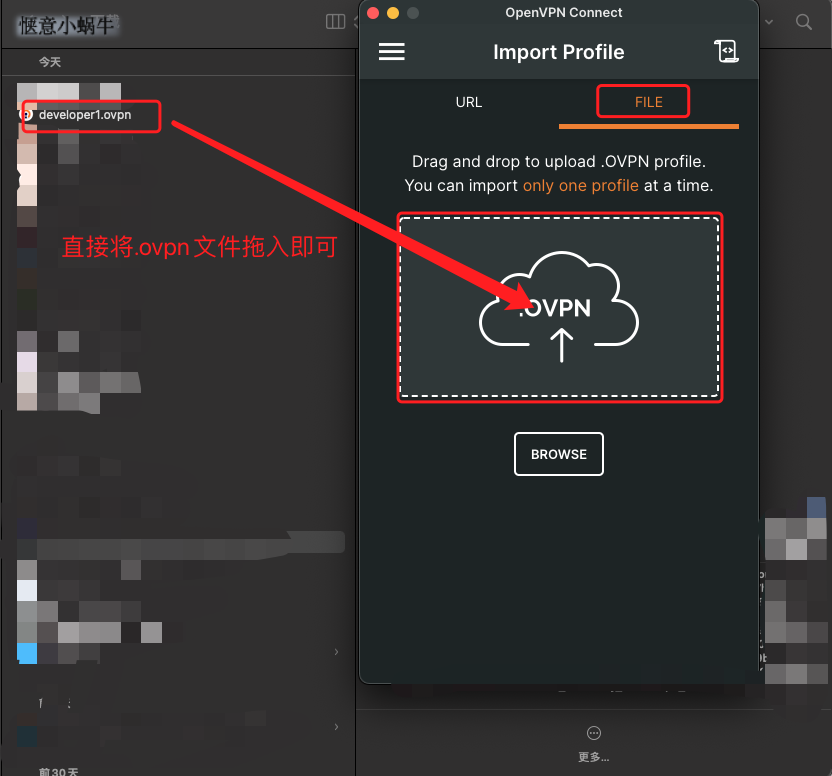
拖入后会显示你 OpenVpn 服务端部署机的公网IP地址

-
点击 “connect” 按钮连接 OpenVpn 进行测试
连接成功
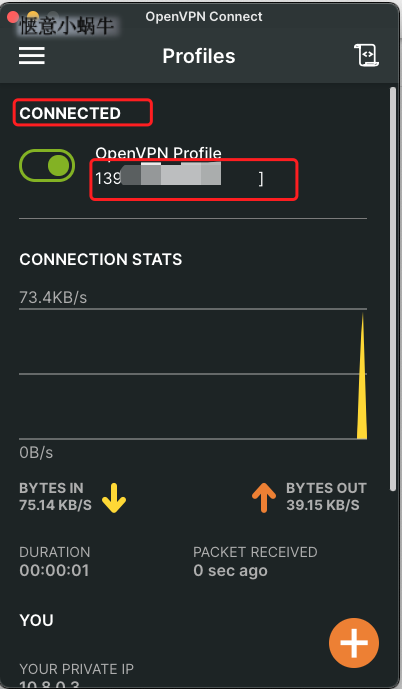
验证结果
查出来的 本机IP 如果与上图 客户端中显示的 IP 相同即为成功连接
Mac 可以使用 curl 命令来检测也可以使用 Windows 相同检测方法
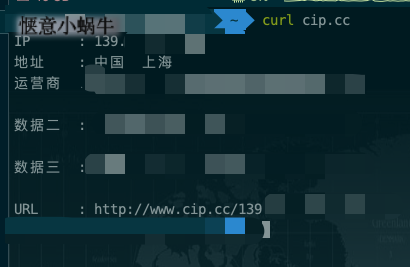
Tunnelblick 客户端配置
- 安装
mac-openvpn-client-Tunnelblick.dmg客户端 - 打开安装好的客户端

注意: 打开后,默认是不展示主配置界面的,可以按如下操作打开配置页面
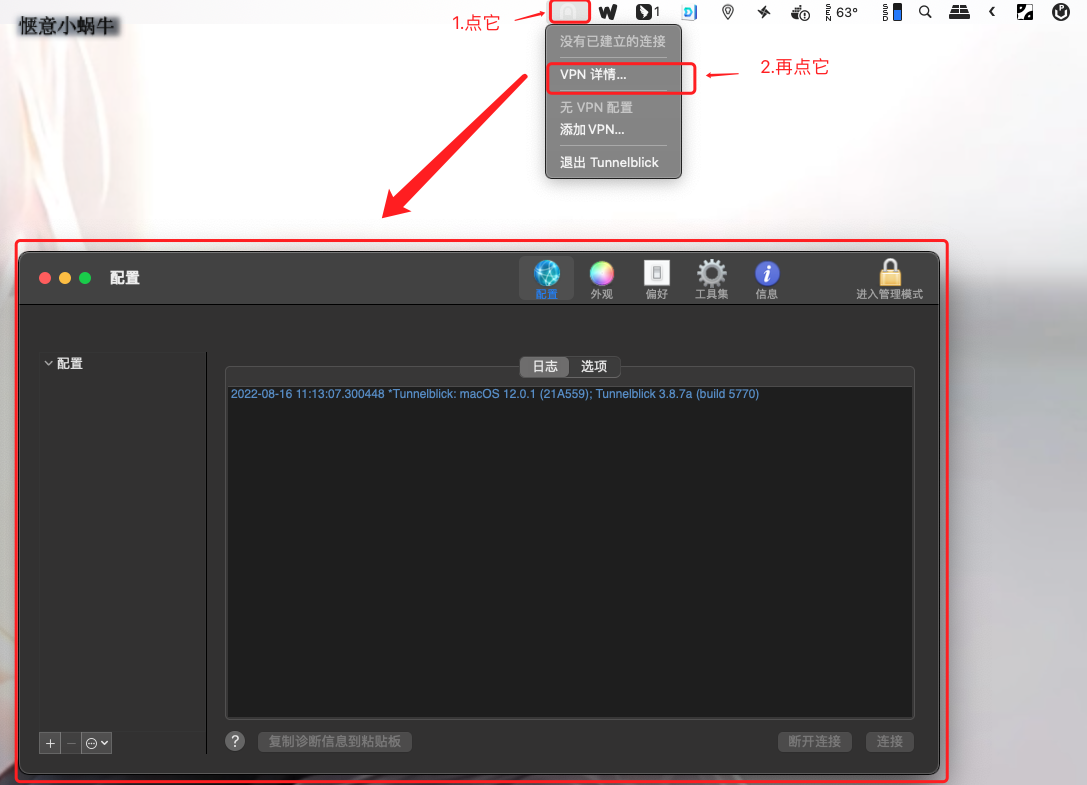
- 拖入下载好的证书文件

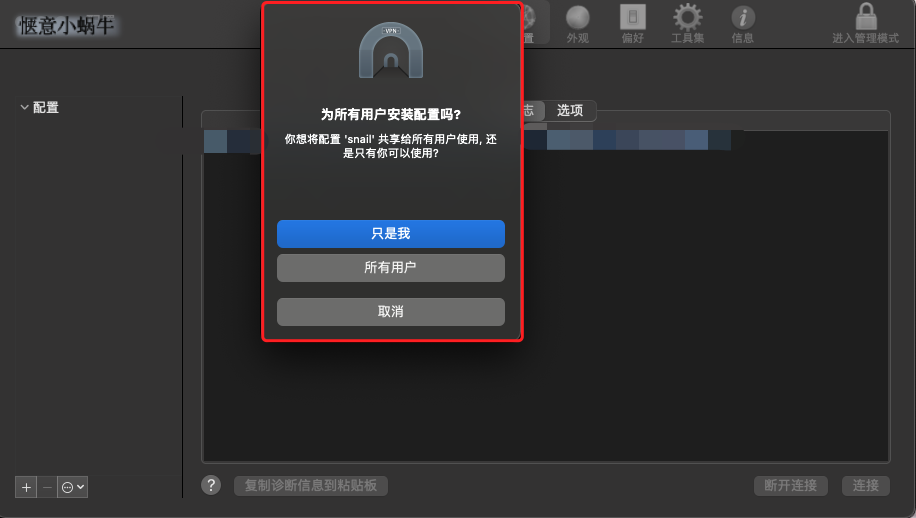
此处根据需要自行选择,选择后或提示如是 Mac 的登录密码进行确认

导入成功如上图
-
连接测试及验证
选中导入的证书后,点击右下角
连接
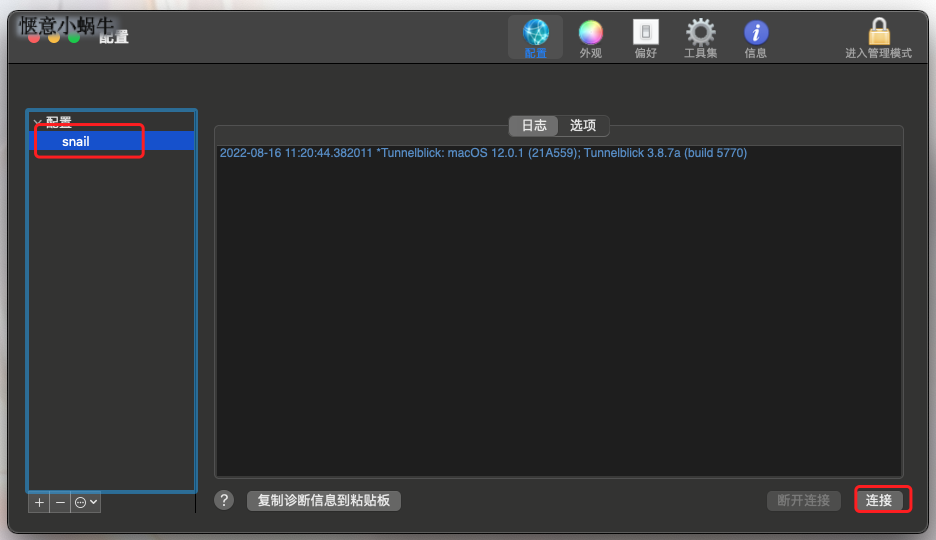
连接中…

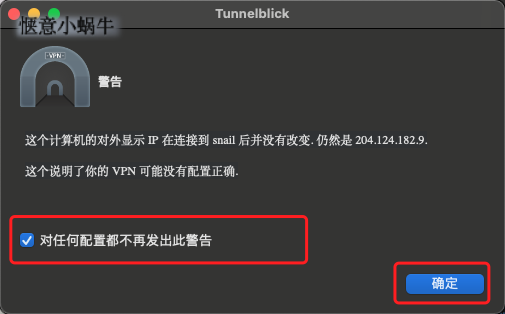
弹框确认
查看连接状态
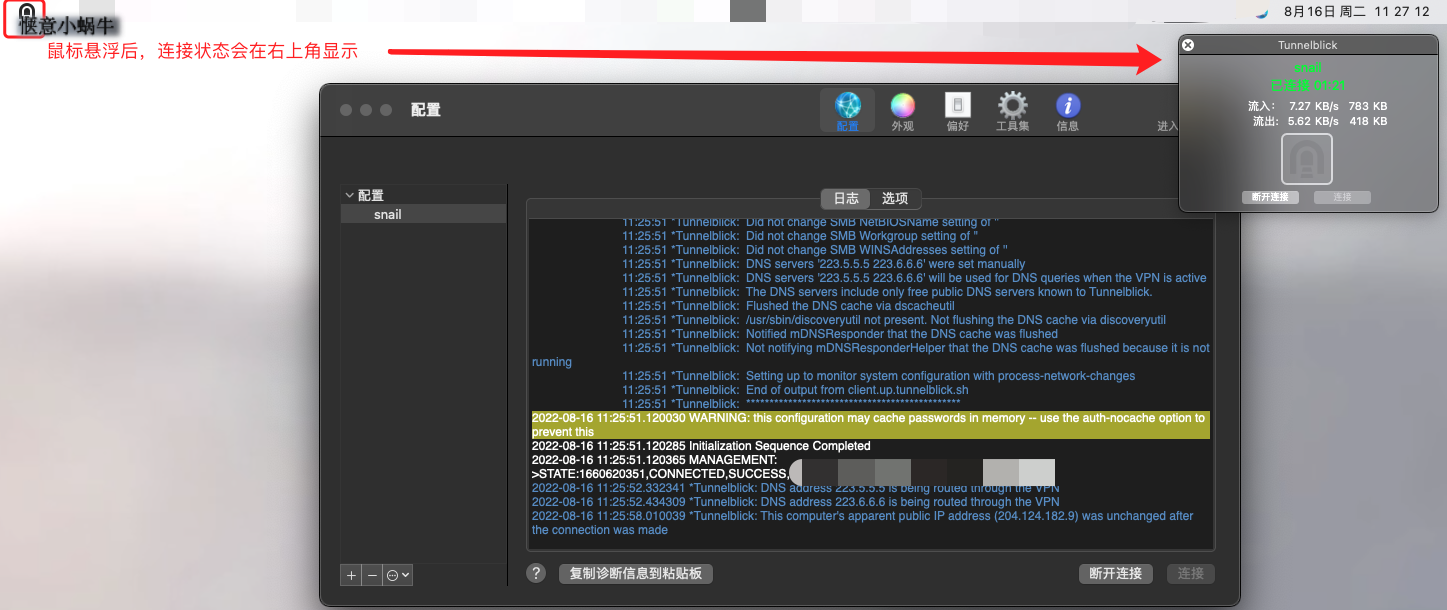
验证结果
查出来的 本机IP 如果与上图 客户端中显示的 IP 相同即为成功连接
Mac 可以使用 curl 命令来检测也可以使用 Windows 相同检测方法


评论区